
Are you looking to secure your website with HTTPS using a load balancer and an SSL certificate?
Configuring SSL on a load balancer allows you to terminate SSL traffic at the load balancer level, offloading CPU-intensive SSL decryption from your backend servers.
In this guide, we’ll walk through the steps to configure SSL for a load balancer, including how to set up an SSL certificate, configure an HTTPS listener, and encrypt traffic between the load balancer and your servers.
Whether you’re using AWS Elastic Load Balancing, setting up SSL on a classic load balancer, or configuring SSL termination, this post will cover what you need to know.
What is a Load Balancer?
A load balancer is a device that distributes network or application traffic across multiple servers.
Load balancers improve the responsiveness and availability of applications, websites, databases, and other services by distributing the workload across multiple servers.
Some key benefits of using a load balancer include:
- Improved performance and responsiveness
- Increased availability and reliability
- Easier scaling of resources
- SSL offloading and centralized SSL certificate management
What is an SSL Certificate?
An SSL certificate is a digital certificate that authenticates a website’s identity and enables an encrypted connection. SSL certificates are what enable websites to move from HTTP to HTTPS, which is more secure.
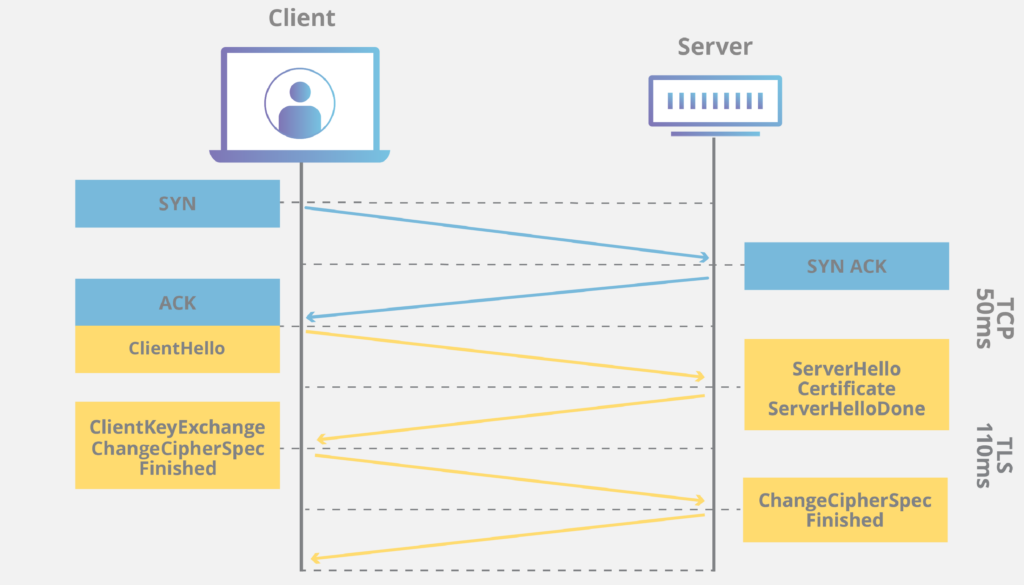
When a browser attempts to access a website that is secured by SSL, the browser and the web server establish an SSL connection using a process called an “SSL Handshake” (see diagram). The SSL handshake uses public-key cryptography to authenticate the server and create a unique session key for encrypting the traffic between the browser and server.
How to Configure SSL on a Load Balancer
Now let’s walk through the steps to configure SSL on a load balancer. The exact steps will vary depending on your load balancer and environment, but the general process is:
- Obtain an SSL certificate
- Configure the load balancer to use the certificate
- Configure backend servers
- Test the SSL configuration
Step 1: Obtain an SSL Certificate
The first step is to obtain an SSL certificate for your domain from a trusted Certificate Authority (CA).
You can purchase a certificate, or if you are using AWS, you can provision a free certificate using AWS Certificate Manager.
When you request a certificate, you will need to provide some information to validate your domain ownership and identity.
This typically involves adding a DNS record or uploading a file to your web server.
The CA will then issue you an SSL certificate, which consists of a certificate file and a private key. In some cases you may also need an intermediate certificate or certificate chain file.
Step 2: Configure the Load Balancer to Use the Certificate
The next step is to configure your load balancer to use the SSL certificate to terminate SSL traffic.
This tells the load balancer to decrypt incoming HTTPS traffic before sending it to the backend servers.
Using the AWS Management Console
If you are using AWS Elastic Load Balancing, you can install an SSL certificate on your load balancer using the AWS Management Console:
- Open the Amazon EC2 console and navigate to “Load Balancers”
- Select your load balancer
- On the “Listeners” tab, click “Edit”
- Click “Add” to add a new listener
- For “Listener port”, enter 443
- For “Listener protocol”, select HTTPS
- For “SSL certificate”, select the certificate to use. You can:
- Select an existing certificate from AWS Certificate Manager
- Upload a new certificate and private key
- Choose a certificate stored in IAM
- Click “Save”
Your load balancer is now configured to use the SSL certificate to terminate HTTPS traffic on port 443.
Using the AWS CLI
You can also configure a certificate on your load balancer using the AWS CLI:
aws elb create-load-balancer-listeners --load-balancer-name my-loadbalancer --listeners
"Protocol=HTTPS, LoadBalancerPort=443, InstanceProtocol=HTTP, InstancePort=80, SSLCertificateId=arn:aws:iam::123456789012:server-certificate/my-server-certificate"
This configures the load balancer to use the specified SSL certificate to terminate HTTPS traffic on port 443, and forward the decrypted HTTP traffic to the instances on port 80.
Step 3: Configure Backend Servers
By default, traffic between your load balancer and backend servers is unencrypted. If you want additional security, you can configure the load balancer to encrypt traffic to the instances as well.
To do this, install the same SSL certificate on your backend servers and configure them to accept HTTPS traffic. Then update your load balancer to use HTTPS or SSL for the instance protocol and specify the same port as the instances.
Now traffic will be encrypted end-to-end, with the load balancer terminating SSL from clients and then re-encrypting traffic to the backend servers.
Step 4: Test the SSL Configuration
After configuring SSL, it’s important to test that everything is working properly. Some things to check include:
- Browse to your site using https:// and ensure the padlock icon appears in the browser
- Use an SSL checker tool to validate your certificate is properly installed and trusted
- Verify the load balancer is sending traffic to the backend servers over the correct port and protocol
- Check the load balancer logs for any SSL handshake errors
Configuring SSL Certificates for Classic Load Balancers
The process to configure SSL certificates is slightly different for Classic Load Balancers compared to Application Load Balancers.
With Classic Load Balancers, you need to create and install the SSL certificate directly on each load balancer. You can use either a certificate from AWS Certificate Manager or upload your own certificate.
To configure a certificate using the AWS Management Console:
- Open the Amazon EC2 console and navigate to “Load Balancers”
- Select the load balancer
- On the “Listeners” tab, click “Edit”
- Click “Add” to add a new listener
- Select HTTPS or SSL for the load balancer protocol and enter the port (443)
- For “SSL certificate”, select a certificate from ACM or IAM, or upload a new certificate
- Choose the cipher for the load balancer to use
- Click “Save”
Repeat this process for each load balancer. Note that the SSL certificate must be valid for the load balancer’s DNS name.
Using Multiple SSL Certificates
In some cases you may need to configure multiple SSL certificates on a single load balancer to support different domains or subdomains.
Application Load Balancers allow you to specify multiple certificates and use Server Name Indication (SNI) to select the correct certificate based on the requested hostname.
To add additional certificates to a load balancer:
- Open the Amazon EC2 console and navigate to “Load Balancers”
- Select the load balancer
- On the “Listeners” tab, click “View/edit certificates”
- Click “Add certificate”
- Select a certificate from ACM, IAM, or upload a new certificate
- Enter the domain name
- Click “Add”
- Click “Save”
You can now configure routing rules to forward traffic to different target groups based on the requested hostname and associated certificate.
Conclusion
Configuring SSL on a load balancer is an important step to securing your website or application. By terminating SSL at the load balancer, you can offload SSL processing from your backend servers while still encrypting data end-to-end.
To recap, the key steps to configure SSL for a load balancer are:
- Obtain an SSL certificate from a trusted Certificate Authority
- Configure the load balancer to use the certificate to terminate SSL traffic
- Optionally configure backend servers to accept encrypted traffic from the load balancer
- Test the SSL configuration to ensure it is working properly
Whether you are using AWS Elastic Load Balancing, setting up a network load balancer, or configuring SSL on a classic load balancer, the basic steps are the same. By following this guide and best practices for SSL, you can secure your load balancer and protect your users’ data.
Read also: